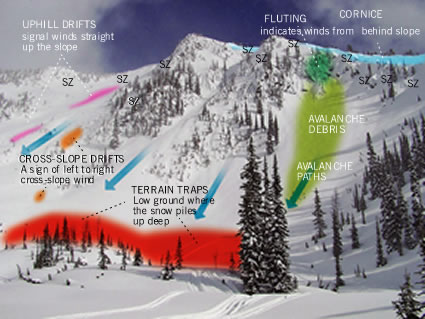
The photo above is beautiful, but complex terrain that presents numerous challenges. It has many start zones (the obvious ones are marked “SZ”) varying in elevation, aspect and slope configuration.
There’s a lot of steep terrain, much variation in ground cover (tree islands, rock outcrops, smooth, etc.) and many different terrain features (convex, concave, planar, etc.).
Most of the avalanche paths (the main ones marked with arrows) have terrain traps in the runout zone—low ground where slides pile up deep and/or trees—which increase the chance of injury.
Complex terrain means a trickier snowpack: variable depths, different layers from one place to the next, and erratic wind effects. Cornices (light blue) indicate winds from the back of the ridge depositing snow on this side; uphill drifts (pink) signal wind straight up the slope likely depositing snow on the backside; and drifts across the slope (orange) are a sign of left-to-right cross-slope wind.
On the other hand, there are positive factors too. Inside the green shape is debris from an avalanche that came from very steep terrain above. It didn’t trigger a fracture on larger slopes below, suggesting the lower slope is reasonably stable.
Fluting (the obvious example is in teal but it’s all over the place) suggests terrain so steep that small, loose slides come down regularly, reducing the chance of slab buildup in the start zone.
These small slides also tend to mix and solidify snow on slopes below, lessening the chance of large avalanches on the bigger slopes where more snow accumulates.
Start zones are generally small and disconnected, making it less likely a large avalanche will take out the whole mountainside. The larger, lower angled slopes below look like the snowpack is deeper at the bottom and shallower above, which, if true, makes these slopes “supported,” reducing the chance of a smaller slide from above triggering something bigger below.
Before taking on this piece of terrain, I’d look at the applicable avalanche bulletin and check with local avalanche pros (ski patrol, park rangers, avalanche-trained guide/outfitters) about persistent weak layers (PWLs).
If a PWL exists here, I’d stay well away from the place—even a scenic tour across the bottom of the slope is out if a PWL is lurking.
If there are no PWLs, I think most of this terrain is a manageable problem if you are a skilled rider and are willing to risk a small avalanche. I’d hedge my bets by:
• Waiting for at least 36 hours after any significant snowfall or wind drifting.
• Waiting for low (moderate at most) avalanche danger ratings.
• Going when air temperatures are cool (-5 degrees or colder) and the sun is off slopes and cornices above.
• Starting on flatter, more open terrain (like the far left slope) where it’s easy to turn out to safe ground and it looks like there are fewer terrain traps.
• Pulling out if I feel the snow getting slabby (hard/firm snow over softer/looser layers).
• Setting up my line to avoid being swept into trees or over a cliff if I get caught in a small avalanche.
• Not carpet bombing the slope: make one or two passes then move on.
• Not stopping in terrain traps at the bottom.
• Ensuring there is one rider at a time with partners watching in case something happens.
• Making sure all others in the area are parked well away from all runout zones at the bottom.
Karl Klassen is the public avalanche bulletins manager for the Canadian Avalanche Association.
Tools for avalanche safety
Avalanche beacon
When an avalanche event occurs, survivors can switch their beacons to search mode, allowing rescuers to receive the signals from anyone buried in snow.
Probe
Probes are the necessary tool to pinpoint the location of someone buried in an avalanche. Probes are built like tent poles—they can be easily folded and stowed away in a backpack.
Shovel
Sounds simple but there are a few need-to-knows. It’s up to the user to walk the fine line between shovel strength and portability. Try to find one with a telescoping handle and avoid plastic blades.
Training
All the safety equipment in the world means nothing without the proper training.
For more information on avalanche safety, visit the Canadian Avalanche Centre’s website at www.avalanche.ca/cac.


