Karl Klassen, public avalanche bulletins manager for the Canadian Avalanche Association, enjoyed the challenge of analyzing this complex terrain near Valemount.
Klassen said that this heavily-featured mountain presents a lot of potential for variation in snowpack depth and strength.
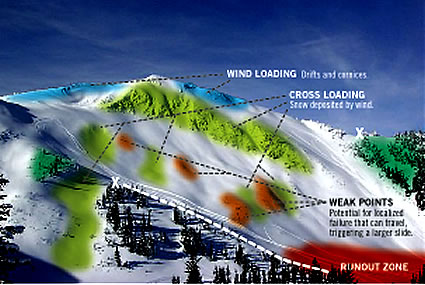
Wind loading and cross loading are important factors in this location.
Cross loading, where wind blows across the slope and deposits snow in low ground behind higher ground or trees, is indicated on the diagram above.
“Many of these places also have convex shapes in the slope which, when combined with loading, are typical places to trigger an avalanche,” said Klassen. “Wind loading has created drifts and cornices in lee areas. In these places, snow from the other side of the peak likely rests on the slopes below, again indicating where triggering avalanches is more likely.”
Features like trees and rock outcroppings create a weakness in the snow cover.
“These are places where the weight of a sled and rider might initiate a localized failure,” said
Klassen. “That can then travel up, down, or across the slope and become a much larger slide.” Riding here is all about managing and reducing risk, said Klassen.
“It’s largely about picking the right time to go,” he said.
Klassen’s recommendations
- Avoid the big cliffs and the slopes under them on principle.
- Don’t go at all if you suspect there might be some kind of persistent weak layer (PWL) in the snowpack.
- Wait for several days after any significant storm.
- Ensure danger is rated low and there have been no recent avalanches in the area.
- Go on a cool, calm morning in late winter or early spring.
- Consider having a spotter off to the side of the slope where they can see if something happens and are in a position to respond quickly.
- Make sure no one parks or plays in the runout zone. Hanging out there is kind of like looking up a gun barrel and seeing the bullet in the chamber with someone fooling around at the trigger end.
- Only one person at a time on the slope—no exceptions.
- Do a first pass on the rib in front of the tracks on the left side (white line). Shut down near the top of the rib where the X is and look/feel/think for a few minutes.
- If it doesn’t feel slabby, do a second pass where the tracks are on the left side of the photo. These guys did a good job of avoiding the problem areas in the slope.
- Don’t go all the way up first go, even if you can. First try to confirm your impressions of wind effect and slab formation.
- Climb on the right and turn left as you top out. If something happens, gun it and head for the high ground in the green area.
How to ride the right side
The slope on the right side of the photo, where the tracks are, is quite different from the one I just went up on the left. I would not make any assumptions about it based on what happened on the first run on the left side. A complete re-evaluation is required before tackling this side.
Feel more confident to take on the slopes on the right side of the photo. There are fewer safe options there, less opportunity to check things out gradually, and bigger consequences if something goes wrong.
If there was a way to get up to the ridge on the top right side of the photo (where the X is) using moderate or treed terrain, do that first to check things out.
Climb on the left and turn right as you top out, so if something happens you are aimed at safer terrain in the trees (in the green shaded area) as you come around.